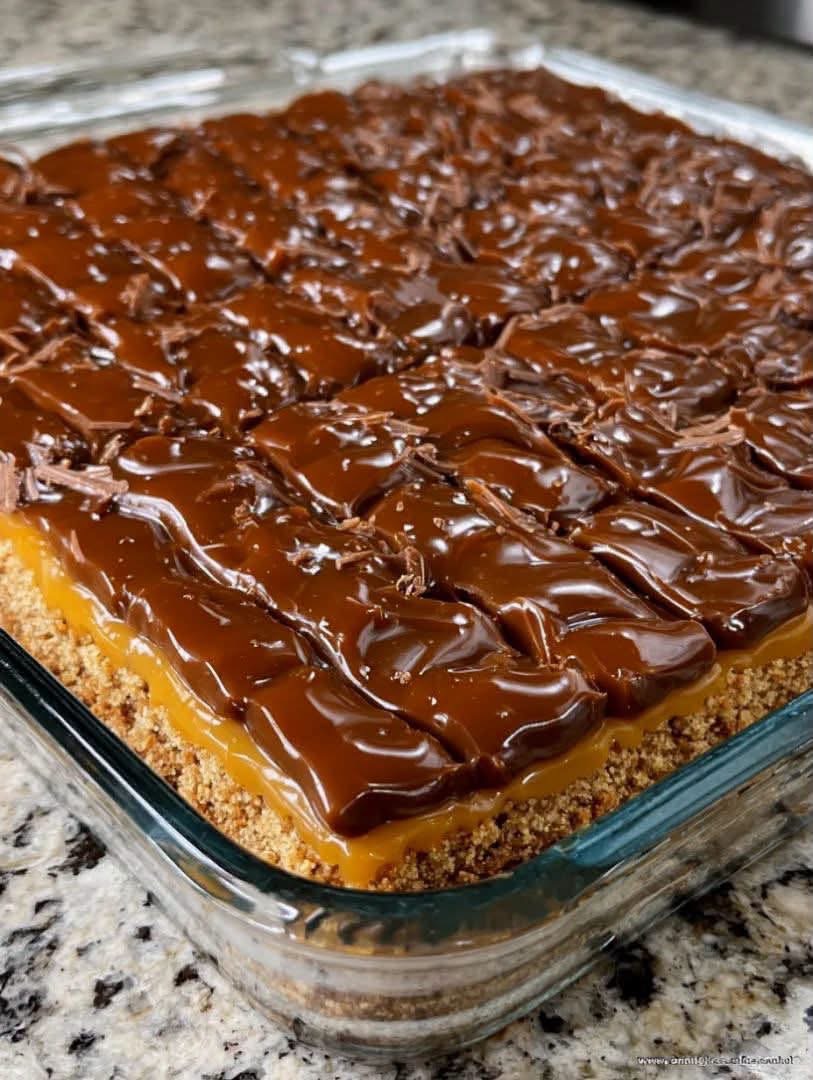
No-Bake Chocolate Caramel Graham Cracker Bars are a rich layered dessert made with a buttery graham-cracker crust, a thick caramel center, and a smooth chocolate topping.
Every square combines three satisfying textures. The crumb base is firm and lightly crunchy, the caramel layer is soft and chewy, and the chocolate topping becomes silky and rich after chilling.
These easy dessert bars are perfect when you want an impressive homemade treat without baking a full cake. They can be prepared ahead of time and refrigerated until you are ready to serve them.
The recipe is ideal for holidays, family gatherings, bake sales, potlucks, birthday parties, summer celebrations, and evenings when you want a chocolate-and-caramel dessert made from simple ingredients.
Why This Recipe Is Popular
Chocolate and caramel are a classic combination because the slightly bitter cocoa flavor balances the deep sweetness of the caramel.
The graham-cracker crust adds a toasted flavor and prevents the dessert from feeling completely soft. It also gives every bar enough structure to hold the thick caramel and chocolate layers.
This recipe is popular with busy home cooks because most of the work involves mixing, spreading, and chilling. No complicated decorating is required.
The bars can be cut into small squares for a party or larger pieces for a plated dessert. Because the layers are rich, even a small serving feels satisfying.
The recipe can also be customized with nuts, peanut butter, sea salt, coconut, pretzels, cookies, or different kinds of chocolate.
Recipe Information
The preparation time is approximately thirty minutes.
The caramel needs time to cool, and the completed dessert should chill for at least four hours.
Overnight refrigeration creates the cleanest slices.
The complete recipe makes approximately sixteen generous bars or twenty-four smaller dessert squares.
Main Ingredients
Graham crackers create the crumbly and lightly toasted foundation.
Melted butter binds the crumbs and gives the crust a rich flavor.
Brown sugar adds sweetness and a gentle molasses taste.
Sweetened condensed milk helps create a smooth and thick caramel layer.
Butter keeps the caramel soft and gives it a glossy finish.
Vanilla and salt balance the sweetness.
Chocolate and heavy cream create the smooth ganache topping.
A small amount of corn syrup can be added to the chocolate for extra shine, although it is optional.
Ingredients for the Graham-Cracker Crust
For the base, you will need approximately three cups of finely crushed graham crackers.
You will also need three-quarters of a cup of melted unsalted butter, one-third cup of packed brown sugar, and a small pinch of salt.
When the graham crackers are already very sweet, the brown sugar can be reduced slightly.
Digestive biscuits, vanilla wafers, shortbread cookies, or chocolate sandwich cookies may also be used.
Ingredients for the Caramel Layer
For the caramel, you will need one fourteen-ounce can of sweetened condensed milk.
You will also need one cup of packed brown sugar, half a cup of unsalted butter, one-quarter cup of light corn syrup or honey, one teaspoon of vanilla extract, and half a teaspoon of salt.
The corn syrup helps create a smooth caramel and reduces graininess.
When you prefer a stronger salted-caramel flavor, use three-quarters of a teaspoon of salt and add a light sprinkle of flaky salt before the chocolate topping sets.
Ingredients for the Chocolate Topping
For the top layer, you will need twelve ounces of semi-sweet chocolate chopped into small pieces.
You will also need three-quarters of a cup of heavy whipping cream and one tablespoon of unsalted butter.
Dark chocolate can replace part of the semi-sweet chocolate when you want a less-sweet dessert.
Milk chocolate creates a sweeter and softer topping.
Chocolate chips may be used, but chopped baking chocolate usually melts into a smoother ganache.
The Best Pan to Use
A nine-by-thirteen-inch baking pan works well for this recipe.
A glass dish, metal baking pan, or disposable aluminum pan may be used.
Line the pan with parchment paper before adding the crust.
Leave extra parchment hanging over two sides to create handles.
These handles make it easier to lift the entire dessert from the pan before cutting.
Lightly grease the parchment so the caramel does not stick around the edges.
How to Crush Graham Crackers
Place the graham crackers inside a food processor and pulse until fine crumbs form.
When a food processor is unavailable, place the crackers inside a strong storage bag and crush them with a rolling pin.
The crumbs should be mostly fine and even.
Large pieces can prevent the crust from holding together.
Measure the crumbs after crushing because different crackers produce different amounts.
Prepare the Graham-Cracker Crust
Place the graham-cracker crumbs inside a large mixing bowl.
Add the brown sugar and salt.
Stir until evenly combined.
Pour the melted butter over the crumbs and continue mixing until every crumb appears moistened.
The mixture should resemble damp sand and should hold together when pressed between your fingers.
When the crust feels dry and loose, add another tablespoon of melted butter.
Press the Crust Into the Pan
Transfer the crumb mixture to the prepared baking dish.
Spread it across the bottom.
Use the flat base of a measuring cup or drinking glass to press the crumbs into a firm and even layer.
Pay special attention to the corners and edges.
A tightly packed crust is easier to slice and less likely to crumble when the bars are served.
Refrigerate the crust while preparing the caramel.
Optional Baked-Crust Method
Although the dessert can be completely no-bake, the crust may be baked for a firmer texture.
Preheat the oven to 350°F.
Bake the pressed crust for approximately eight to ten minutes.
Remove it when it looks lightly golden and smells toasted.
Allow it to cool completely before adding the caramel.
Do not pour hot caramel over a warm crust because the butter may soften and cause the layers to mix.
Choosing the Right Saucepan for Caramel
Use a heavy-bottomed saucepan.
A heavy pan distributes heat more evenly and reduces the risk of burning the sugar.
Choose a saucepan large enough to hold the caramel while it bubbles.
The mixture expands as it heats, so a small pot may overflow.
Use a heat-resistant silicone spatula or wooden spoon for stirring.
Begin the Caramel Layer
Place the butter, brown sugar, sweetened condensed milk, corn syrup, and salt inside the saucepan.
Set the pan over medium-low heat.
Stir continuously while the butter melts and the sugar begins dissolving.
Keep the spatula moving across the bottom and corners of the pan.
Condensed milk and sugar can burn quickly when left over direct heat without stirring.
Cook the Caramel
Once the mixture becomes smooth, increase the heat slightly and bring it to a gentle simmer.
Continue cooking for approximately five to eight minutes.
Stir constantly.
The caramel should become thicker, darker, and glossy.
Avoid boiling it aggressively because excessive heat can cause scorching or create a hard caramel layer after chilling.
The mixture is ready when it coats the spatula and slowly falls back into the saucepan in thick ribbons.
Add the Vanilla
Remove the saucepan from the heat.
Add the vanilla extract carefully.
The mixture may bubble briefly.
Stir until the vanilla is completely incorporated.
Allow the caramel to rest for two or three minutes.
Do not let it cool completely inside the saucepan because it will become difficult to spread.
Spread the Caramel Layer
Remove the chilled crust from the refrigerator.
Pour the warm caramel over the center.
Use an offset spatula or the back of a spoon to spread it gently toward the edges.
Create an even layer without pressing into the crumb crust.
Tap the pan lightly on the counter to release trapped air and help the caramel settle.
Refrigerate the pan for approximately one hour before adding the chocolate topping.
The caramel should feel firm enough that the chocolate will remain on the surface.
How to Prepare the Chocolate Ganache
Place the chopped chocolate inside a heat-safe bowl.
Heat the heavy cream inside a small saucepan over medium-low heat.
Remove the cream from the heat when steam rises and small bubbles appear around the edges.
Do not boil it strongly.
Pour the hot cream over the chocolate.
Leave the mixture untouched for approximately three minutes.
This resting time allows the chocolate to soften evenly.
Stir the Ganache
Begin stirring slowly from the center of the bowl.
Continue making small circles until the chocolate and cream combine.
Add the butter and stir until the ganache becomes smooth and glossy.
When a few chocolate pieces remain, place the bowl over warm water briefly and continue stirring.
Avoid overheating the ganache because excessive heat can cause it to become oily or grainy.
Cool the Ganache Slightly
Allow the chocolate ganache to rest for approximately ten to fifteen minutes.
It should remain easy to spread but should no longer feel extremely hot.
Very hot chocolate can soften the caramel and cause the layers to blend.
Stir the ganache once or twice while it cools so it remains smooth.
Add the Chocolate Layer
Remove the chilled caramel crust from the refrigerator.
Pour the ganache slowly over the center.
Use an offset spatula to spread it evenly to every corner.
Create soft swirls across the top when you want the textured appearance shown in the image.
For a perfectly smooth surface, gently move the pan from side to side before the chocolate begins setting.
Add Optional Garnishes
Flaky sea salt can be sprinkled lightly over the ganache.
Chopped pecans, walnuts, peanuts, almonds, or hazelnuts can also be added.
For a more decorative dessert, use chocolate curls, crushed graham crackers, caramel drizzle, or small candy pieces.
Add garnishes while the chocolate is still soft so they remain attached.
Avoid adding a heavy topping because these bars are already rich.
Chill the Completed Bars
Cover the baking pan without allowing plastic wrap to touch the chocolate.
Refrigerate for at least four hours.
Overnight chilling provides the strongest structure and cleanest slices.
Keep the pan level inside the refrigerator so the layers remain even.
Do not attempt to cut the bars while the caramel and ganache are still soft.
How to Remove the Dessert From the Pan
Run a thin knife along the two sides without parchment overhang.
Lift the complete dessert using the parchment handles.
Place it on a large cutting board.
When the bars feel extremely firm, allow them to rest at room temperature for approximately ten minutes before cutting.
Do not leave them in a warm kitchen for too long because the caramel may soften.
How to Cut Clean Squares
Use a large sharp knife.
Dip the blade inside hot water, then dry it completely.
Press through the chocolate layer using steady pressure.
Clean and warm the knife before every new cut.
This method prevents chocolate and caramel from building up on the blade.
Cut the dessert into four long rows, then divide each row into four or six pieces.
How to Serve the Bars
Serve the bars chilled or slightly softened at room temperature.
Small portions are recommended because the caramel and chocolate layers are rich.
Place each piece inside a paper cupcake liner for parties or bake sales.
For a plated dessert, add whipped cream, vanilla ice cream, fresh berries, or a small drizzle of warm caramel.
Hot coffee, cold milk, espresso, and unsweetened tea pair especially well with the sweet layers.
Simple Recipe Overview
Prepare a crumb crust using crushed graham crackers, melted butter, brown sugar, and salt.
Press the mixture firmly into a lined baking dish.
Cook the sweetened condensed milk, brown sugar, butter, corn syrup, and salt until thick and glossy.
Spread the caramel over the chilled crust.
Prepare chocolate ganache with chopped chocolate and hot cream.
Spread the ganache over the firm caramel.
Chill the dessert completely before cutting.
Tips for the Best Chocolate Caramel Bars
Press the crumb crust very firmly.
Use a heavy-bottomed saucepan for the caramel.
Stir the caramel continuously to prevent burning.
Keep the heat moderate.
Allow the caramel to firm before adding chocolate.
Cool the ganache slightly before spreading it.
Chill the completed dessert overnight when possible.
Use a warm, clean knife for every cut.
Store the bars inside the refrigerator.
Common Mistakes to Avoid
Do not leave large pieces inside the graham-cracker crumbs.
Avoid adding too little butter to the crust.
Do not cook the caramel over extremely high heat.
Avoid leaving the caramel unattended.
Do not pour very hot chocolate over a soft caramel layer.
Avoid cutting the bars before they have chilled completely.
Do not leave the completed dessert in a warm room for an extended period.
Salted Caramel Chocolate Bars
For a stronger salted-caramel flavor, add extra salt to the caramel layer.
Use approximately three-quarters of a teaspoon of fine salt inside the caramel.
Sprinkle flaky sea salt over the chocolate before it sets.
The salt balances the sweetness and brings out the flavor of the chocolate.
Add the garnish lightly because too much salt can overpower the dessert.
Millionaire-Style Graham Cracker Bars
Traditional millionaire bars use a shortbread crust.
This variation uses graham crackers for a faster preparation and a lightly toasted flavor.
For a more traditional result, replace the crumb base with baked shortbread.
The caramel and chocolate layers can remain the same.
The completed dessert will have a firmer and more buttery bottom.
Turtle Chocolate Caramel Bars
Add chopped toasted pecans to the caramel layer.
Use approximately one cup of pecans.
Sprinkle another small handful over the chocolate topping.
The combination of caramel, chocolate, and pecans creates a dessert inspired by turtle candies.
Toast the nuts before using them to strengthen their flavor and improve their crunch.
Peanut Butter Chocolate Caramel Bars
Spread a thin layer of creamy peanut butter over the chilled caramel before adding the chocolate.
The peanut butter should be smooth and not excessively oily.
You can also stir several tablespoons of peanut butter into the warm ganache.
A small sprinkle of chopped peanuts provides additional texture.
Reduce the salt when using salted peanut butter.
Pretzel Caramel Chocolate Bars
Replace part of the graham-cracker crumbs with finely crushed pretzels.
The pretzels add salt and crunch.
Use approximately two cups of graham crumbs and one cup of pretzel crumbs.
Press the mixture firmly and prepare the remaining layers normally.
Decorate the chocolate with broken pretzel pieces shortly before serving.
Coconut Caramel Bars
Add one cup of toasted shredded coconut to the crumb crust or caramel layer.
Coconut provides a chewy texture and nutty flavor.
Toast it carefully because shredded coconut can darken quickly.
Sprinkle a small amount over the ganache for decoration.
This variation tastes similar to popular chocolate, caramel, and coconut cookies.
Dark Chocolate Caramel Bars
Use dark chocolate containing approximately sixty to seventy percent cocoa.
Dark chocolate creates a more intense topping and balances the sweet caramel.
The ganache may become slightly firmer after chilling.
Allow the bars to rest at room temperature for several minutes before cutting and serving.
A light sprinkle of sea salt works especially well with dark chocolate.
Milk Chocolate Caramel Bars
Milk chocolate creates a sweeter and softer topping.
Reduce the heavy cream slightly so the ganache remains firm enough to cut.
Begin with twelve ounces of milk chocolate and approximately half a cup of cream.
Chill the dessert thoroughly before slicing.
This version is ideal for guests who prefer a mild chocolate flavor.
White Chocolate Caramel Bars
Replace the semi-sweet chocolate with white chocolate.
White chocolate is softer and requires less cream.
Use twelve ounces of white chocolate with approximately half a cup of heavy cream.
The finished dessert will be very sweet, so add a stronger pinch of salt to the caramel.
Decorate the surface with dark chocolate drizzle for contrast.
Oreo Caramel Chocolate Bars
Replace the graham crackers with crushed chocolate sandwich cookies.
Use the cookies with their cream filling included.
Reduce the melted butter slightly because the filling adds moisture and fat.
The dark cookie crust creates a stronger chocolate flavor.
This variation pairs well with milk-chocolate or semi-sweet ganache.
Biscoff Caramel Chocolate Bars
Use crushed spiced cookies for the crust.
Their cinnamon and caramelized flavor complements the caramel filling.
Biscoff spread can also be added as a very thin layer beneath the ganache.
Because the cookies and spread are sweet, dark chocolate is an excellent choice for the topping.
Nut-Free Chocolate Caramel Bars
The original recipe can easily be prepared without nuts.
Check the labels of the crackers, chocolate, and other packaged ingredients when serving someone with a serious allergy.
Use plain graham crackers and avoid nut-based garnishes.
Crushed cookies, sea salt, caramel drizzle, or chocolate curls can be used for decoration.
Gluten-Free Chocolate Caramel Bars
Use gluten-free graham-style crackers.
Check that the condensed milk, chocolate, corn syrup, vanilla, and other ingredients are labeled gluten-free when necessary.
Prepare the crust according to the same method.
Gluten-free crumbs may absorb butter differently, so add the melted butter gradually.
The mixture should remain firm when pressed.
Dairy-Free Chocolate Caramel Bars
Use dairy-free butter, sweetened condensed coconut milk, dairy-free chocolate, and full-fat coconut cream.
The caramel will have a light coconut flavor.
Cook it slowly until thick.
Dairy-free ganache may remain softer, so refrigerate the bars overnight.
Check every packaged ingredient carefully when preparing the dessert for someone avoiding dairy.
Individual Chocolate Caramel Dessert Cups
The layers can be assembled inside clear plastic cups or small jars.
Add graham-cracker crumbs to the bottom.
Spoon caramel over the crumbs.
Finish with cooled chocolate ganache.
Individual cups do not require cutting and are convenient for parties.
Chill them for at least three hours before serving.
Mini Caramel Chocolate Bites
Prepare the recipe inside a mini muffin pan lined with paper liners.
Press a small amount of crust into every cup.
Add caramel and chocolate in thinner layers.
Chill until firm.
Mini bites are useful for dessert platters, birthday parties, holiday boxes, and bake sales.
Remove them from the refrigerator shortly before serving.
Serving the Bars at a Holiday Gathering
Prepare the bars one or two days before the celebration.
Keep them covered inside the refrigerator.
Cut them while they are very cold.
Arrange the pieces on a large platter with parchment paper between layers.
Add sea salt, chopped nuts, or chocolate curls shortly before serving.
Keep the platter cool until dessert time.
Serving the Bars at a Bake Sale
Cut the dessert into small and even squares.
Place each square inside a decorative paper liner.
Package individual bars inside clear containers or bags.
Keep them refrigerated until close to serving time.
Add a label indicating that the bars contain dairy, gluten, and any nuts used in the recipe.
What to Serve With Chocolate Caramel Bars
These bars are rich enough to serve alone.
Fresh strawberries, raspberries, or sliced bananas provide a lighter contrast.
Whipped cream and vanilla ice cream also work well.
For drinks, serve the bars with coffee, espresso, milk, tea, or hot chocolate.
Unsweetened beverages help balance the caramel and chocolate.
Make-Ahead Instructions
The complete dessert can be prepared up to three days before serving.
Keep it covered inside the refrigerator.
For the cleanest presentation, cut the bars on the day they will be served.
The crust may gradually soften after several days but should remain flavorful.
Add crunchy garnishes shortly before serving so they keep their texture.
How to Store the Bars
Place the cut bars inside an airtight container.
Arrange them in one layer when possible.
When stacking is necessary, place parchment paper between the layers.
Refrigerate for up to five days.
Keep them away from strongly scented foods because chocolate and butter can absorb surrounding odors.
Can You Freeze Chocolate Caramel Bars?
Yes.
Chill and cut the bars first.
Place them in one layer inside a freezer-safe container.
Add parchment paper between additional layers.
Freeze for up to two months.
Thaw the bars overnight inside the refrigerator.
Do not thaw them inside a very warm room because the caramel may become too soft.
Serving the Bars Partially Frozen
The bars can be served slightly frozen for a firmer and chewier texture.
Remove them from the freezer approximately fifteen to twenty minutes before serving.
Use a warm knife when cutting frozen pieces.
The chocolate becomes firm, while the caramel has a candy-like texture.
Allow young children to eat the bars only after they soften enough to chew safely.
Why Is My Crust Crumbling?
The crumbs may be too large or may not contain enough butter.
Crush the crackers finely and mix until every crumb is moistened.
Press the mixture firmly into the pan.
Chilling the crust before adding caramel also helps it remain stable.
When using dry cookies, another tablespoon of melted butter may be necessary.
Why Is My Crust Too Hard?
The crumb mixture may contain too much butter or may have been compressed excessively.
Use enough pressure to create a firm crust without turning it into a dense solid layer.
A baked crust can also become hard when it remains in the oven for too long.
Allow refrigerated bars to rest briefly before serving.
Why Is My Caramel Too Soft?
The caramel may not have cooked long enough.
It needs several minutes of gentle simmering to reduce and thicken.
The bars may also require additional chilling time.
Refrigerate them overnight.
When the caramel remains very loose, place the dessert inside the freezer for a short period before cutting.
Why Is My Caramel Too Hard?
The caramel may have cooked for too long or over excessive heat.
Hard caramel becomes difficult to cut after refrigeration.
Allow the bars to rest at room temperature for ten to fifteen minutes.
Next time, cook the mixture only until it becomes thick and glossy rather than extremely dark.
Why Did My Caramel Become Grainy?
The sugar may not have dissolved evenly.
Stir continuously and keep the heat moderate.
Corn syrup helps reduce crystallization.
Avoid scraping dry sugar crystals from the sides of the pan into the finished caramel.
Use fresh brown sugar without hard lumps.
Why Did the Caramel Burn?
Sweetened condensed milk and sugar can scorch quickly.
Use a heavy-bottomed saucepan and medium-low heat.
Stir across the entire bottom and into every corner.
Remove the pan immediately when you notice a burned smell.
Burned caramel cannot be repaired because the bitter flavor spreads throughout the mixture.
Why Is My Ganache Grainy?
The chocolate may have become too hot or may have come into contact with water.
Use a dry bowl and utensils.
Pour hot cream over finely chopped chocolate rather than heating the chocolate directly.
Stir gently after the resting period.
Avoid whisking aggressively because this can introduce excess air.
Why Is the Chocolate Topping Too Hard?
The ganache may contain too much chocolate and too little cream.
Allow the bars to rest at room temperature before cutting.
Use a warm knife.
For the next batch, increase the cream slightly or add another tablespoon of butter.
Dark chocolate usually produces a firmer topping than milk chocolate.
Why Is the Chocolate Topping Too Soft?
The ganache may contain too much cream or may not have chilled long enough.
Refrigerate the dessert for several additional hours.
Use real chocolate rather than thin chocolate syrup.
For the next batch, increase the chocolate slightly or reduce the cream.
Why Are My Layers Mixing Together?
The caramel may have been too soft when the ganache was added.
Refrigerate the caramel until it feels firm across the surface.
The ganache may also have been too hot.
Allow the chocolate to cool until warm and pourable before spreading it.
Why Are My Slices Messy?
The dessert may not be cold enough.
Refrigerate it overnight or place it in the freezer for twenty minutes.
Use a long sharp knife warmed in hot water.
Dry and clean the blade between every cut.
Avoid using a sawing motion through the soft caramel.
Can I Use Store-Bought Caramel Sauce?
Ordinary caramel sauce is usually too thin for a stable center layer.
Use a thick caramel filling or dulce de leche when you want a shortcut.
Chill it thoroughly before adding the ganache.
Store-bought caramel may produce softer bars, so keep them refrigerated until serving.
Can I Use Dulce de Leche?
Yes.
Spread approximately two cans of thick dulce de leche over the chilled crust.
Add a small amount of salt and vanilla when desired.
Refrigerate until firm before applying the chocolate.
This shortcut eliminates the stovetop caramel step and creates a smooth milk-caramel flavor.
Can I Double the Recipe?
Yes.
Prepare the recipe inside two separate nine-by-thirteen-inch pans.
Avoid making one extremely thick dessert because the caramel may not chill evenly.
Prepare the caramel in a large heavy saucepan and watch it carefully.
Keep both pans level inside the refrigerator.
Final Thoughts
No-Bake Chocolate Caramel Graham Cracker Bars are an indulgent layered dessert made with a buttery crumb crust, thick homemade caramel, and smooth chocolate ganache.
The crisp graham-cracker base balances the soft caramel and rich chocolate topping.
For the best result, crush the crackers finely and press the crust firmly into the pan.
Cook the caramel slowly inside a heavy saucepan and stir continuously.
Allow the caramel to become firm before adding the cooled ganache.
Refrigerate the completed dessert overnight and use a warm, clean knife for neat slices.
Customize the bars with sea salt, pecans, peanut butter, pretzels, coconut, cookies, or dark chocolate.
These easy chocolate caramel bars are perfect for holidays, potlucks, parties, bake sales, family gatherings, and make-ahead desserts.